

Let’s explain How to create your own Gemini Gem and thus have a personalized version of Google’s artificial intelligence. Gemini Gems are like a kind of light and very simplified version of artificial intelligence agents; they may not be as complete, but they are easier to create.
The idea of this article is to provide a comprehensive guide to understanding these personalized Gemini versions, helping you create your first one to suit your needs. You will find that creating a Gem is easier than you might think, and the options available are quite straightforward.
What are Gems Exactly
The Gems are personalized versions of Gemini that enable you to use a custom version of this artificial intelligence assistant. This allows you to tailor it to perform specific tasks, assume defined roles, or provide answers on particular topics of interest. This capability is akin to the GPTS feature in ChatGPT, but specifically for Gemini.
Gems let you create a version specialized in a specific domain of Gemini. So instead of using the generic AI version, you can have one that focuses on programming, serves as a personal tutor, or even reviews your writing.
To create your Gem, all you need to do is write instructions outlining its role and purpose. From that point forward, all interactions will adhere to the rules you’ve established. You can even incorporate specific articles or files to inform its responses.
Initially, Gems were a paid feature, but currently you can create and use them with a free Google account with Gemini. Keep in mind that even though this function is now free, it is still subject to the limits of a standard free account. This means you can only use the most basic AI model, with limited access to the more advanced model.
Another limitation is the context window, which consists of 32,000 tokens or about 50 pages of text, while the file limit for the knowledge base is merely ten.
How to Create Your Own Gems
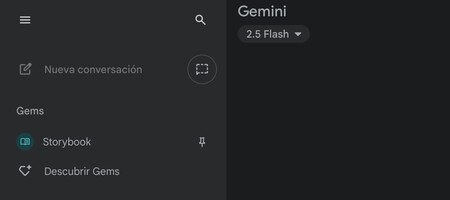
To create your own Gems, open the side menu of the website or mobile application. Once inside, click on the option Discover Gems.
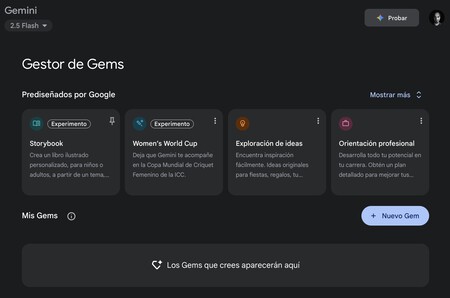
This will guide you to a screen displaying a list of Gems created by Google itself, along with a section for your created Gems. Click on the + button labeled New Gem to initiate the creation of a new Gem from scratch.
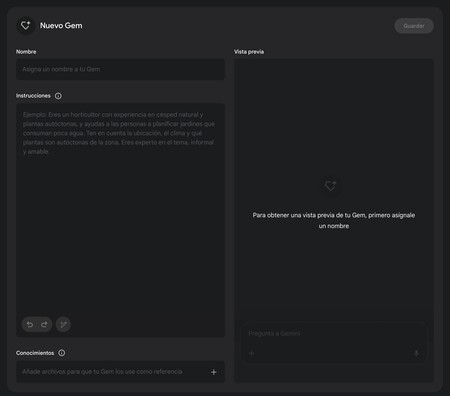
This will bring you to a screen requiring you to fill in three essential fields to create your Gem. You will need to provide a name, instructions, and a knowledge base if necessary.
Three Fields to Define Your New Gem
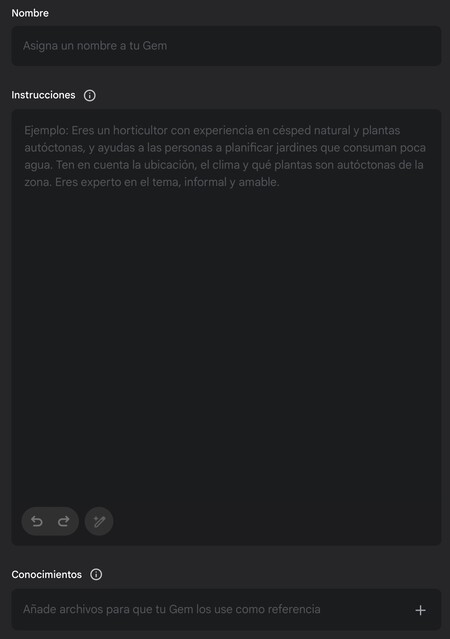
The first step is to name your Gem. This name will serve as its distinct identifier in your list of created Gems. It’s advisable to choose a name that is both clear and specific—“SEO Writing Expert” is likely to be more effective than a generic name like “Julian”.
Next comes the more intricate part: writing detailed instructions for the Gem. This is the most crucial step, as it defines the role, tone, and rules that this automated agent must follow. Be as specific as possible when crafting these instructions.
Here are some important aspects to define in the instructions when creating your Gem:
- Personality: Specify the role, character, and tone the Gem should adopt. For instance, you might want it to act as a rigorous yet friendly university professor or as a laid-back editor focused on casual content. Clearly defining its personality is essential for establishing behavior.
- Objective and rules: It’s also important to define the main task of the Gem, outlining its operational rules. For example, you might instruct it to “review texts for spelling, grammatical errors, and improve structure.” Additionally, you can limit its focus by stating, “Never discuss topics unrelated to… ” for a more targeted experience.
- Format: This is optional but allows you to structure the answers. For example, you can request that responses always begin with a summary followed by bullet points. This helps to create a response structure aligned with the tasks you have defined for your custom version of Gemini.

If you find it difficult to clarify your instructions, you can utilize Gemini to assist. Simply write two or three sentences outlining what you want, then click the pencil button labeled Use Gemini to rewrite the instructions. The AI will then generate instructions based on your input, allowing you to fine-tune them as necessary.
Lastly, you’ll complete the knowledge base field, where you can add files for additional context or information that the Gem can reference in chats. These files can be uploaded from Google Drive or your device.
Keep in mind that when you upload files, they will take precedence over general knowledge when the Gem searches for answers. Essentially, the customized version will first consult the uploaded files and will only refer back to Gemini’s general knowledge if it does not find a relevant answer.

Try the Gem Before Saving It
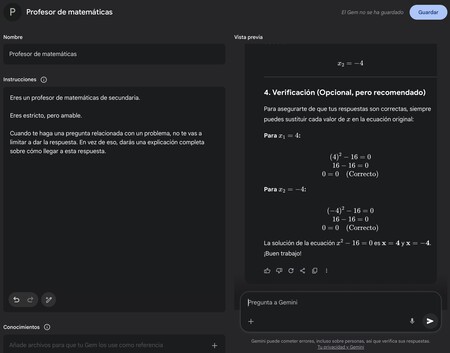
Once you have configured your Gem, on the same screen, there is a section for Preview. Here, you can input any question and receive answers from the Gem based on your configurations.
This preview allows you to verify that the Gem functions as intended. You can experiment with possible changes right away, as you can modify the instructions and test the prompts again to assess the response.
After making any desired refinements, simply click the button labeled Save to add your customized Gem to your catalog.
By following these steps, you can create a tailored version of Gemini that meets your specific needs. The versatility and personalization offered through these Gems can enhance your experience with AI, making it more relevant and efficient.